LEGO Street View Car v2.0
Nov 2011

You might remember the original Lego Street View Car I built in April. It was very popular at the Google Zeitgeist event earlier this year.
I wanted to re-build the car to only use the Lego Mindstorms NXT motors. I was also keen to make it look more....car-like. The result, after 4 months of experimentation, is version 2.0 of the Lego Street View Car.
The Street View Car was showcased at the World Robot Olympiad event in Abu Dhabi in November 2011.
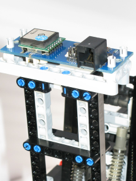
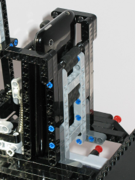
The original Street View car was powered by two Power Function XL motors, but for this version I wanted to use only NXT motors. I managed to come up with a design that is powered using a single NXT motor, which involved a lot of engineering to gear down to have sufficient torque to move the chassis. A side effect of this design is that the car does drive a lot slower than the first version from earlier this year. A second NXT motor controls the steering, leaving the third motor port free to power important things like the headlights.
In a change from the previous version I decided to use my iPhone to capture images on the car. With iOS 5 the iPhone will upload any photos to PhotoStream so I can access them directly in iPhoto.
As before the car uses the Dexter Industries dGPS sensor to record the current GPS coordinates.
A big change in this version of the car is that I use the Dexter Industries Wifi sensor to transmit the KML file that records the path taken by the car to my laptop. In the previous version I had to connect my car using a cable to the laptop to upload data. Using the Wifi sensor is the first step towards an entirely wireless control of the car.
Design details

When I press a button on the remote the car goes into Capture mode. In Capture mode it will record a GPS coordinate every 20 seconds. The coordinates (latitude and longitude) are recorded from the dGPS and stored in the NXT RAM in an array. Capture mode can be started and stopped as many times as I want; the upper limit on the number of GPS coordinates captured is the size of the RAM in the NXT.
I cheated a little to capture the photos. I downloaded a time-lapse photo app for my iPhone which is configured to take a photo every 20 seconds. If I start the Capture mode and the time-lapse app at the same time then the car will capture an image and record the GPS coordinate of the location of the image. It’s not perfect, but it works!
Once the car has completed a run I press the center orange button on the NXT and the NXT creates a KML format file in the flash filesystem. The KML file records not only the coordinates that the car visited, but a “path” that it took. KML is Google Earth’s standard format to describe locations on a map. Opening the KML file in Google Earth shows the path that the car drove, and also has placemarks for every picture you took along the way. Click on the placemark to see the picture.
For each GPS coordinate I create a KML Placemark entry that embeds descriptive HTML code using the CDATA tag. The image link in the HTML refers to the last image captured on disk.
To get the photos from the iPhone I use the PhotoStream feature in iOS 5. I select the pictures in iPhoto and export them to my laptop. The iPhone will only upload photos when I am in range of a wireless network.
Sample KML file
<Placemark>
<name>LSVC Snapshot 1</name>
<description><![CDATA[<img src='Images/IMG_1.jpg' width=640 height=480> ]]></description>
<Point>
<coordinates> -6.185952, 53.446190, 0</coordinates>
</Point>
</Placemark>
<Placemark>
<name>LSVC Snapshot 2</name>
<description><![CDATA[<img src='Images/IMG_2.jpg' width=640 height=480> ]]></description>
<Point>
<coordinates> -6.185952, 53.446190, 0</coordinates>
</Point>
</Placemark>
The snippet from the KML file gives you an idea of what each placemark should look like.
Once the car has finished driving press the orange button on the NXT to save the KML file. This writes a <pathstring> entry which records the actual path of the car. A path string is simply a list of coordinates that define a path in Google Earth along the Earth’s surface. For example:
<Placemark>
<name>LSVC Path</name>
<description>LSVC Path</description>
<styleUrl>#yellowLineGreenPoly</styleUrl>
<LineString>
<extrude>10</extrude>
<tessellate>10</tessellate>
<altitudeMode>clampToGround</altitudeMode>
<coordinates>
-6.185952, 53.446190, 0
-6.185952, 53.446180, 0
</coordinates>
</LineString>
</Placemark>
Is a path two coordinates not far from where I live.
From the NXT to Google Earth
How do we get the pictures and KML file from the NXT and into Google Earth? First of all we need to get all the data in one place. The KML file refers to the relative path of each image, so we can package the KML file and the images into a single directory.
An example of the output produced is shown below. In this test case I started indoors in my house and took a few pictures. As you can see the dGPS has trouble getting an accurate reading and so the pictures appear to be scattered around the map. I then drove the car outside and started to capture pictures as I drove. From Snapshot 10 onwards the images become more realistic based on where the car actually is.

Video
I shot some video of the car driving outside my house. It was a windy dull day, so the video is a little dark. The fun part is seeing the view from on-board the car!
I created this short montage of photos to show the evolution from the previous version of the car to the current model:
Source Code
There are two source files and a number of supporting header files. I leveraged a lot of code from Xander Soldaat and also Dexter Industries, so credit to them for bootstrapping me. The code for the car is written in RobotC to simplify the process of talking to the Wifi sensor.
The remote control code is fairly straightforward; poll the buttons and send commands to the car over Bluetooth.
-
• Remote control code is in: lsvccontrol.c
-
•The main source file for the car is: lsvc2_CLEAN.c. In this source file I declare two variables that you have to change: ssid[] and wpa_psk[]. The ssid[] array holds the SSID for your local wireless network. The wpa_psk[] array should store the passphrase you use to authenticate onto your wireless network.
-
• Supporting header and source files are here: LSVC source.zip
Pictures
Last updated 12 November, 2011
All content © 2008 2009 2010 2011 Mark Crosbie mark@mastincrosbie.com
LEGO® is a trademark of the LEGO Group of companies which does not sponsor, authorize or endorse this site. This site, its owner and contents are in no way affiliated with or endorsed by the LEGO Group. For more please read the LEGO Fair Play policy.
